February 18, 2022

A favicon in WordPress is a graphical image related to a particular webpage or a website. Many of the search engines use them as a visual reminder of the website identity in the address bar or in the other tabs. The image should be in the dimension of 16×16 pixels or 32×32 pixels, using either an 8-bit or 24-bit colour. Plus, it should be in PNG format.
Where Is The Favicon In WordPress
Favicon is the little image that appears next to your internet site title in the browser. It helps the more frequent visitors/new users to identify a website or webpage with a built-in instant identification containing the small images.
This helps in increasing brand recognition and supports you to build trust within the target audience. In this article, we will provide you with a Step-By-Step Guide to change your Favicon in WordPress.
How To Add Favicons In WordPress
You have three alternatives for setting favicon in WordPress:
- Method 1: By using the WordPress Customizer,
- Method 2: By using a plug-in, or
- Method 3: By adding it manually.
Keep reading for the details on each of these options.
Method 1: Adding a favicon via WordPress Customizer
Step 1: In the WordPress dashboard, select the Appearance head and then click on Customize tab.
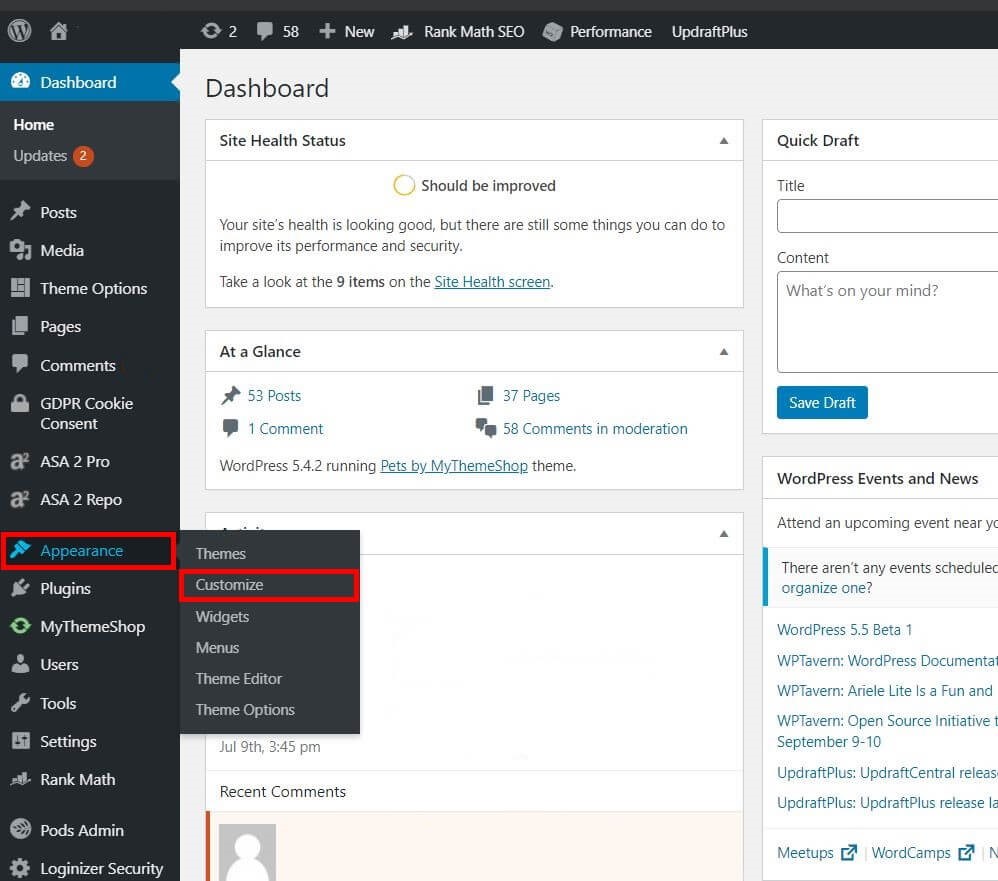
Step 2: Further, the customizer will open. Now, click on Site Identity.

Step 3: Click on the Select site icon.
Under this head, you can add/edit the title and tagline of your site.
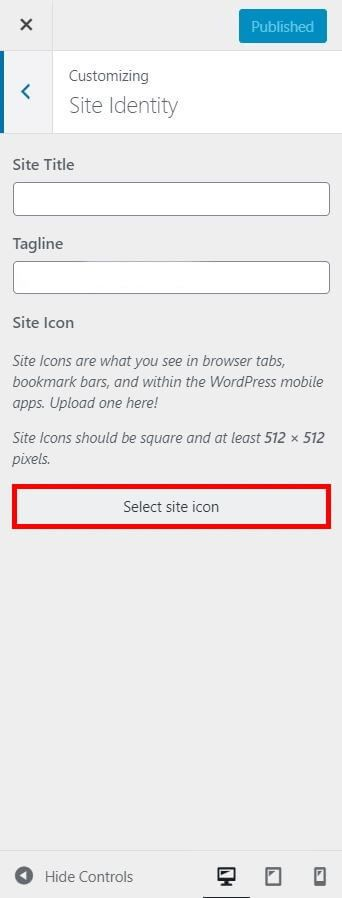
Step 4: Now you need to select the favicon you want to add to your website.
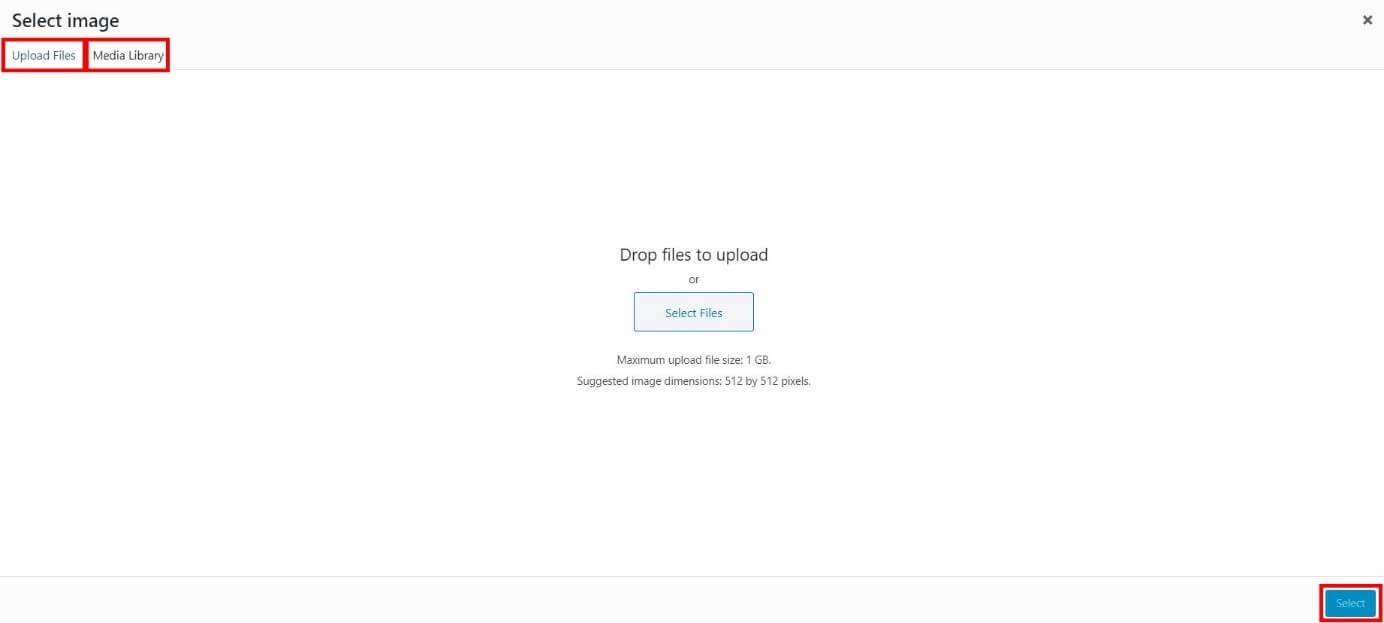
Step 5: The WordPress media library will open up. Now, click on the Upload Files button.
Step 6: Now, select the file from the computer. To confirm your choice, click on the Select button.
Step 7: Resize the favicon as WordPress displays a preview of your favicon in the menu on the right. Once the cropping is complete, just click on “Skip Cropping”
Method 2: Adding a Favicon plug-in
WordPress renders a plug-in for most of the features you need. One of the free popular plug-ins is Favicon by RealFaviconGenerator. This favicon offers the support, customize the favicon according to your requirement.
Step 1: Firstly, install the plug-in from the Plugins section in the WordPress dashboard and then click on Add New.
Step 2: Open the settings for the plug-in and click on the Appearance tab in the side menu and then Favicon. On this page, you can adjust the settings related to your favicon.
Step 3: For selecting your favicon, click on Select from the Media Library.
Note: The image required size is 70×70 pixels, still, a size of 260×260 or bigger is preferred. After selecting the image, confirm by hitting on Generate favicon.
Step 4: Now set your favicon for the website.
Read More: How to Install Yoast WordPress SEO Plugin to Your Website
Method 3: Insert the Favicon Manually in WordPress
You can manually update your Favicon in WordPress. You can thus apply a favicon to your WordPress site using File Transfer Protocol (FTP).
For this, you need a favicon package with different files and HTML code. Both of them can easily be produced with an online tool.
Step 1: Make a favicon file via an online tool for generating a favicon.
Further, with this, you have an option of editing the general properties of your image, such as size (dimensions) and background. Once you complete the desired changes, select “Generate your Favicons and HTML code” at the end of the webpage
In continuation with the next step, download the favicon package and copy the same HTML code. Name the downloaded package as “favicon.ico”, so that it can easily be recognized as a favicon.
Step 2: Now upload the favicon package using FTP to access the WordPress data. Ensure that the data is uploaded in the same folder of the WordPress Admin panel.
Step 3: And now insert HTML code.
Lastly, open the Header.php file and add the HTML code for the favicon in the header field. Ensure that the domain and favicon details entered are correct.
How To Change Favicon in WordPress
To change the favicon in WordPress admin, follow the below-mentioned steps:
Step 1: First, log in to the WordPress website.
As you log in, you will lend on to the Dashboard.
Step 2: On the left side pane, under the menu list, click on the ‘Appearance’ head.
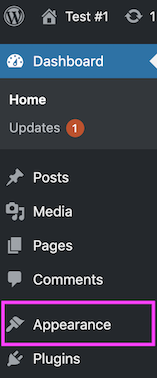
The appearance setting will open and provide you with additional options.
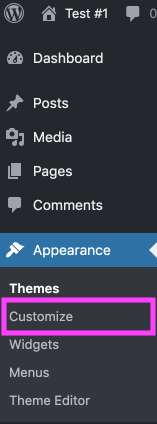
Step 3: Click on the Customize tab.
Step 4: Then click on the Site Identity.
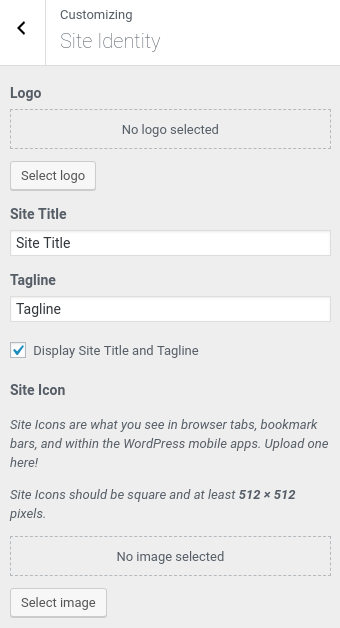
Under this head, you can update your Site title (name), tagline, logo, and Icon.
This favicon image of the website can be updated under the header Site icon
Add/Update Your WordPress Favicon Today: Conclusion
It merely takes a few minutes to update/add your favicon and provide your user with a more brand name experience. And above all, once you add a favicon to your WordPress site, you just have to update it with the competitive business market. Do not hesitate to provide feedback in the comment section below.
Recent Posts


ARE YOU A LEADING SEO SERVICE PROVIDER?
Get listed in world's largest SEO directory today!
Directory listing counter is continuously increasing, be a part of it to gain the advantages, 10380 Companies are already listed.